
In this tutorial, we’ll guide you through creating a simple, solution to route all traffic through your home network using two Raspberry Pi devices and ZeroTier. This setup allows you to securely connect to your home network from anywhere and route all your internet traffic through your home network, providing an extra layer of security and privacy. You will also get the same IP address as you Home network from anywhere in the world. ZeroTier is a powerful tool that allows you to create secure virtual networks, enabling your devices to communicate as if they’re on the same local network, regardless of their physical locations.
Note: This tutorial is inspired by the DigitalOcean guide and harivemula guide.
Prerequisites
Before we begin, ensure you have the following:
- Two Raspberry Pi devices with Raspberry Pi OS installed and updated. (I used two Raspberry Pi 3 devices with Raspberry Pi OS (64-bit, Kernel version: 6.6) for this tutorial.)
- Internet connectivity for both Raspberry Pi devices.
- A ZeroTier account. If you don’t have one, you can create it for free at ZeroTier Central.
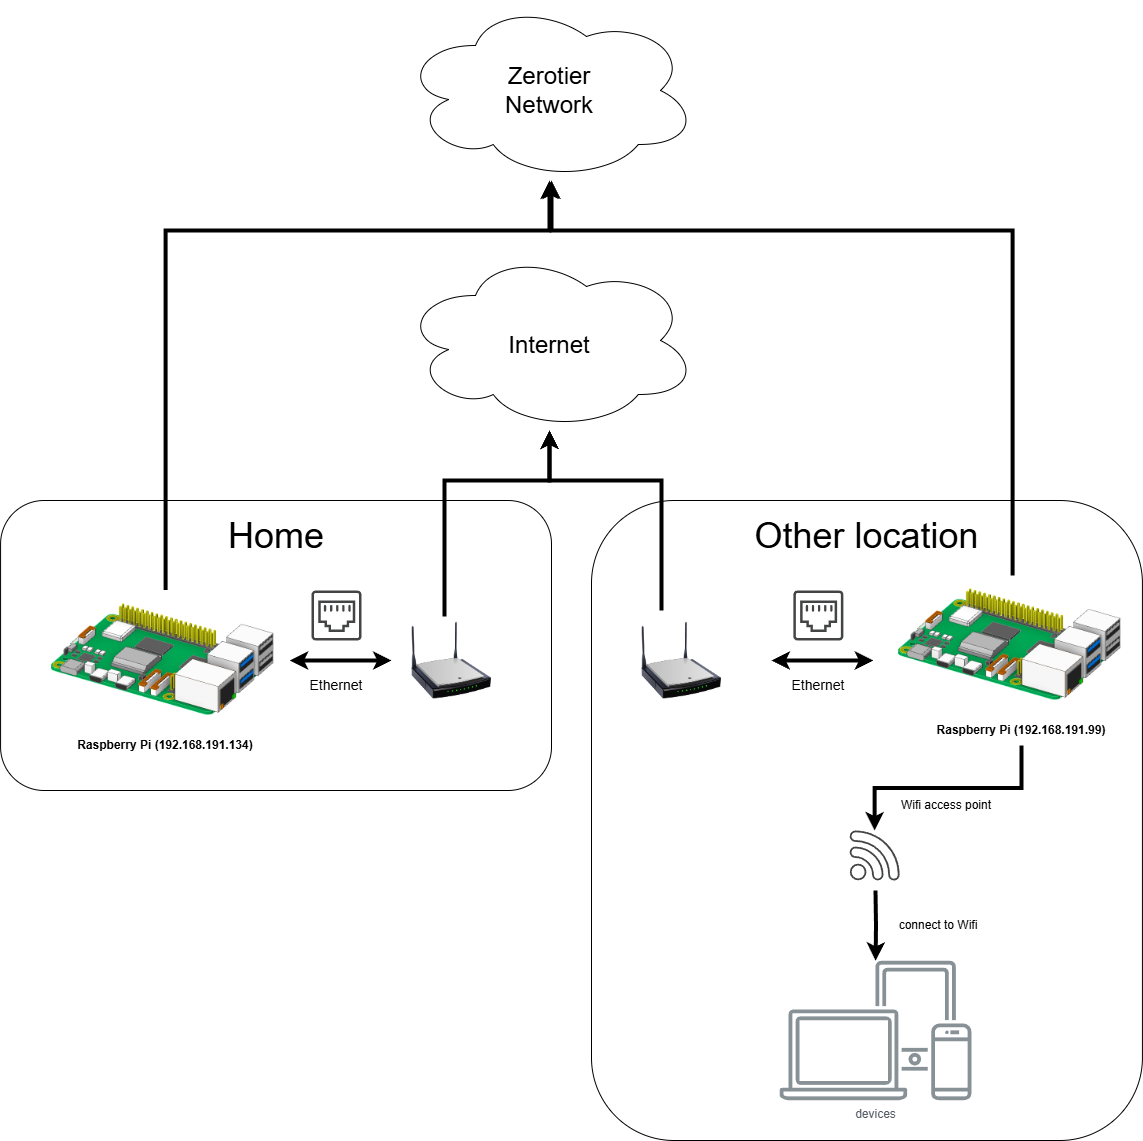
Overview of the Architecture
Step 1: Set Up a ZeroTier Network
Create a ZeroTier Account
- Visit ZeroTier Central and sign up for a free account.
Create a New Network
- Once logged in, click on “Create A Network.”
- A new network will be created, and you’ll be provided with a unique Network ID. Note this ID, as you’ll need it later.
Configure the Network
- Click on your newly created network to access its settings.
- Here, you can set a name for your network and adjust other settings as needed.
- Ensure that “Private” is selected under “Access Control” to keep your network secure.
Step 2: Install ZeroTier on the Raspberry Pi Devices
Perform the following steps on both Raspberry Pi devices.
Install needed packages
Install the ZeroTier repository and its GPG key:
1curl https://raw.githubusercontent.com/zerotier/ZeroTierOne/master/doc/contact%40zerotier.com.gpg | gpg --dearmor | sudo tee /usr/share/keyrings/zerotierone-archive-keyring.gpg >/dev/null1RELEASE=$(lsb_release -cs)1echo "deb [signed-by=/usr/share/keyrings/zerotierone-archive-keyring.gpg] http://download.zerotier.com/debian/$RELEASE $RELEASE main" | sudo tee /etc/apt/sources.list.d/zerotier.list1 2sudo apt update sudo apt install -y zerotier-oneVerify the Installation:
1sudo zerotier-cli statusYou should see an output indicating that ZeroTier is online.
Install additional packages:
1sudo apt install dnsmasq hostapd iptables dhcpcd5dnsmasq: A lightweight DNS and DHCP server.
iptables: A tool for configuring the Linux kernel firewall.
hostapd: A user space daemon for access point and authentication servers. (Only needed for the Travel Raspberry Pi for setting up a Wi-Fi access point)
dhcpcd5: A DHCP (Dynamic Host Configuration Protocol Client Daemon) client and server. (Only needed for the Travel Raspberry Pi for setting up a static IP address)
Step 3: Join your ZeroTier Network
Run the following command on each Raspberry Pi:
1sudo zerotier-cli join [Your_Network_ID]Replace
[Your_Network_ID]with the Network ID you noted earlier.Authorize the Devices:
In ZeroTier Central, under your network’s settings, scroll down to the “Members” section.
You should see the Raspberry Pi devices listed as new devices. Check the “Auth?” box next to each device to authorize them on the network and click “Authorize” button.
You can also rename the devices to make them easily identifiable.
Verify Connectivity:
On each Raspberry Pi, list the networks to confirm they’re connected:
1sudo zerotier-cli listnetworksYou should see your network listed with the status “OK.”
Step 4: Test the VPN Connection
Obtain the ZeroTier IP Addresses: In ZeroTier Central, under the “Members” section, note the managed IP addresses assigned to each Raspberry Pi. If no IP address is assigned automatically, you can assign one manually. In this tutorial, we’ll use the ZeroTier IP addresses
192.168.191.99for the Travel Raspberry Pi and192.168.191.134for the Home Raspberry Pi.
Test Connectivity: You can join the same network on your local machine using the ZeroTier client and ping the Raspberry Pi devices to verify connectivity.
1ping [ZeroTier_IP_of_Raspberry_Pi]You should receive responses, indicating a successful VPN connection.
Step 5: Configure Home Raspberry Pi
To configure the home Raspberry Pi to route all traffic through it, follow these steps:
Enable IP Forwarding:
Open the sysctl configuration file:
1sudo nano /etc/sysctl.confUncomment or add the following line to enable IP forwarding:
1 2net.ipv4.ip_forward=1 net.ipv4.conf.all.rp_filter=2Apply the changes:
1sudo sysctl -p
Configure
dnsmasq:Open the
dnsmasqconfiguration file:1sudo nano /etc/dnsmasq.confAdd the following line to configure the DNS server:
1server=192.168.1.1
Configure
rc.local:Open the
rc.localfile:1sudo nano /etc/rc.localAdd the following lines before the
exit 0line to join the ZeroTier network and set up NAT:1 2 3 4sudo zerotier-cli join [Your_Network_ID] sudo iptables -t nat -A POSTROUTING -o eth0 -j MASQUERADE sudo iptables -A FORWARD -m conntrack --ctstate RELATED,ESTABLISHED -j ACCEPT sudo iptables -A FORWARD -i ztc3qulcfx -o eth0 -j ACCEPTPS: The Home Raspberry Pi may also be connected to the internet via Wi-Fi. In this case, replace
eth0with the interface name of the internet connection (e.g.wlan0).Make
rc.localfile executable:1sudo chmod +x /etc/rc.local
Configure ZeroTier Network Settings:
Open the ZeroTier network configuration file:
1sudo nano /var/lib/zerotier-one/networks.d/[Your_Network_ID].local.confAdd the following lines to allow managed routes and global traffic:
1 2 3 4allowManaged=1 allowGlobal=1 allowDefault=1 allowDNS=0
Reboot the Raspberry Pi:
Reboot the Raspberry Pi to apply all changes:
1sudo reboot
Step 6: Configure Travel Raspberry Pi
This Raspberry Pi should be connected to the internet via Ethernet and will act as a Wi-Fi access point for other devices. All traffic from the Wi-Fi clients will be routed through the ZeroTier network and the Home Raspberry Pi. PS: If you want to connect the Travel Raspberry Pi to the internet via Wi-Fi, you need an additional USB Wi-Fi adapter. (not covered in this tutorial) To configure the Travel Raspberry Pi, follow these steps:
Configure Static IP Address:
Open the DHCP client configuration file:
1sudo nano /etc/dhcpcd.confAdd the following lines to set a static IP address for the
wlan0interface:1 2 3interface wlan0 static ip_address=192.168.1.1/24 nohook wpa_supplicant
Configure
dnsmasq:Open the
dnsmasqconfiguration file:1sudo nano /etc/dnsmasq.confAdd the following lines to configure DHCP and DNS settings:
1 2 3 4interface=wlan0 server=8.8.8.8 server=8.8.4.4 dhcp-range=192.168.1.2,192.168.1.200,255.255.255.0,24h
Enable wlan0:
Ensure wlan0 is unblocked:
1 2sudo rfkill unblock wlan sudo ifconfig wlan0 up
Configure
hostapd:Open the
hostapdconfiguration file:1sudo nano /etc/hostapd/hostapd.confAdd the following lines to configure the Wi-Fi access point:
1 2 3 4 5 6 7 8 9 10country_code=DE interface=wlan0 ssid=TESTWLAN channel=13 auth_algs=1 wpa=2 wpa_passphrase=[passphrase] wpa_key_mgmt=WPA-PSK wpa_pairwise=TKIP CCMP rsn_pairwise=CCMPChange [passphrase] with your own password for the Wi-Fi access point. The Wi-Fi access point name used here is “TESTWLAN”
Set the correct permissions for the configuration file:
1sudo chmod 600 /etc/hostapd/hostapd.confUnmask, start and enable
hostapd:1 2 3sudo systemctl unmask hostapd sudo systemctl start hostapd sudo systemctl enable hostapdConfigure hostapd to run as a background service:
1sudo nano /etc/default/hostapdAdd following lines:
1 2RUN_DAEMON=yes DAEMON_CONF="/etc/hostapd/hostapd.conf"
Enable IP Forwarding:
Open the sysctl configuration file:
1sudo nano /etc/sysctl.confUncomment or add the following line to enable IP forwarding:
1net.ipv4.ip_forward=1Apply the changes:
1sudo sysctl -p
Test that the Wi-Fi access point can be enabled:
- Run following command
1sudo hostapd /etc/hostapd/hostapd.confConfigure
rc.local:Open the
rc.localfile:1sudo nano /etc/rc.localAdd the following lines before the
exit 0line to join the ZeroTier network and start necessary services on boot:1 2 3 4 5 6sudo rfkill unblock wlan sudo ifconfig wlan0 up sudo zerotier-cli join [Your_Network_ID] sudo systemctl start dhcpcd sudo iptables -t nat -A POSTROUTING -o ztc3qulcfx -j MASQUERADE sudo hostapd /etc/hostapd/hostapd.confPS: Replace
ztc3qulcfxwith the interface name of the ZeroTier network.Make
rc.localfile executable:1sudo chmod +x /etc/rc.local
Configure ZeroTier Network Settings:
Open the ZeroTier network configuration file:
1sudo nano /var/lib/zerotier-one/networks.d/[Your_Network_ID].local.confAdd the following lines to allow managed routes and global traffic:
1 2 3 4allowManaged=1 allowGlobal=1 allowDefault=1 allowDNS=0
Reboot the Raspberry Pi:
Reboot the Raspberry Pi to apply all changes:
1sudo reboot
Step 7: Configure ZeroTier Managed Routes
You should now configure the ZeroTier managed routes to ensure that traffic is routed correctly between the Raspberry Pi devices. Following is my ZeroTier managed routes configuration:
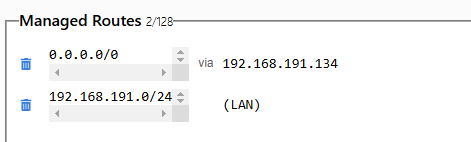
- The IP address
192.168.191.134is the ZeroTier IP address of the Travel Raspberry PI. - 192.168.191.0/24 (LAN) is the ZeroTier server’s network.
Step 8: Test the VPN connection
To test the VPN connection, connect to the Wi-Fi access point of the Travel Raspberry Pi and try to access the internet. You should see that all traffic is routed through the Home Raspberry Pi. You can verify this by checking your public IP address, which should match the public IP address of the Home Raspberry Pi.
Additional Considerations
Security: Ensure that you have strong passwords and firewall rules in place to secure your network.
Performance: The performance of your VPN may vary based on the Raspberry Pi model and network conditions.
Troubleshooting: If you encounter issues, check the logs on both Raspberry Pi devices for error messages and investigate accordingly.
Desabling the VPN: If you want to disable the VPN, you can simply stop the ZeroTier service on both Raspberry Pi devices:
1sudo systemctl stop zerotier-oneYou can also set allowDefault back to 0:
1sudo zerotier-cli set NetworkID allowDefault=0